Setting up a DD4T development environment
Looking back at 2013 we can see that there has been an increased interest in DD4T, a light-weight framework for creating dynamic websites with Tridion and MVC. It supports Tridion 2009/2011/2013 and both Java (Spring MVC) and .NET (MVC3 and MVC4).
This is the second part in a series of two posts where I will explain how to set-up a Virtual Machine development environment with Tridion and DD4T. In the first part create a Virtual Machine for Tridion development I explained the steps of setting up a Virtual Machine with Windows 2008 and Tridion 2011SP1. In this post I will explain all the steps needed to configure your freshly installed Tridion environment for use with DD4T. I will show how to install DD4T templates, create a default Schema, Page Template and Component Template, publish content to the Broker Database and render your first published page in your DD4T .NET MVC4 application. In this post I will use Tridion 2011SP1 and .NET MVC4, but most steps will hold for MVC3 or Java developers as well.
Prerequisites
- Tridion 2011SP1 installation with Content Manager and Content Delivery installed.
- Content Delivery configured for publishing to your Broker database. If you haven't done this already, open the
cd_storage_conf.xmlfile located atC:\Program Files (x86)\Tridion\configand add the Tridion Broker Database as default storage location. Refer to the Content Delivery installation manual for detailed instructions on setting up the Content Delivery. - Visual Studio installed (2012 or 2013 is recommended).
- Recommended: a custom Tridion PowerShell profile to manage Tridion services. Read my previous post on installing a custom Tridion PowerShell profile.
Create a Tridion BluePrint structure
The foundation of every Tridion installation is its BluePrint structure. Within Tridion every item belongs to a publication, and the relation of parent/child publications is called a BluePrint. Changing the BluePrint of an existing Tridion installation can be a time consuming process, or might not be possible at all. So great care should be taken in designing a BluePrint suitable for your needs. In my development environments I often have a BluePrint structure consisting of four publications, each one being a child of the one above, with the Empty Master as master publication without any content:
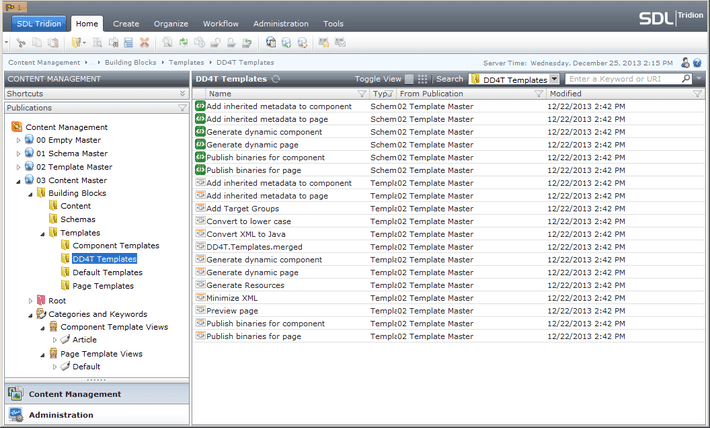
Numbering publications within Tridion helps showing the publication hierarchy, as publications in the Content Manager are ordered alphabetically. One trick: after creating the first publication 00 Empty Master, add a structure group named Root to the publication else the empty master can't have any children.
Installing DD4T templates
The DD4T website contains two files to quickly get you started with DD4T. The first is a set of Tridion templates that help transforming the content to an XML structure that DD4T can process. Currently there is an installer available for Tridion 2009/2011/2013. During the installation you need to specify a TCM URI of a Tridion folder where you would like to install the templates. Pick an existing folder (or create a new one) in the Template Master publication. I've picked 03 Content Master > Building Blocks > Templates > DD4T Templates. The second template is a Visual Studio 2012/2013 project template to create an MVC4 application. Download and install this template to give you a new Project Template called DD4T MVC4 Web Application.
Configure publication targets
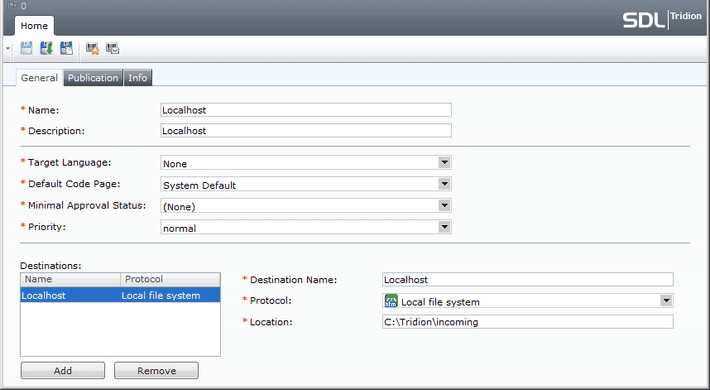
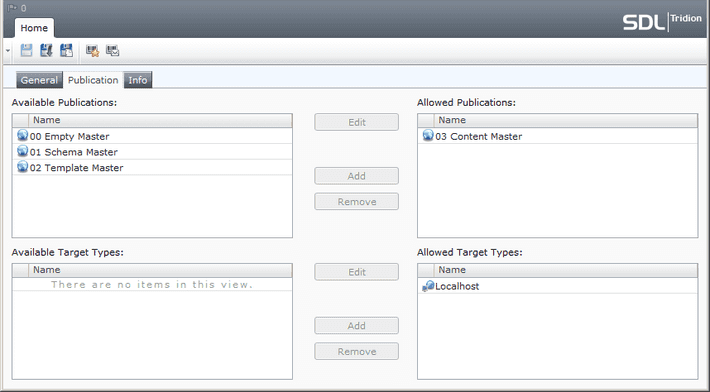
Create a Publication Target Localhost and Target Type Localhost and configure publication from 03 Content Master to publication target Localhost. Let your content publish to C:\tridion\incoming.
Create Schemas
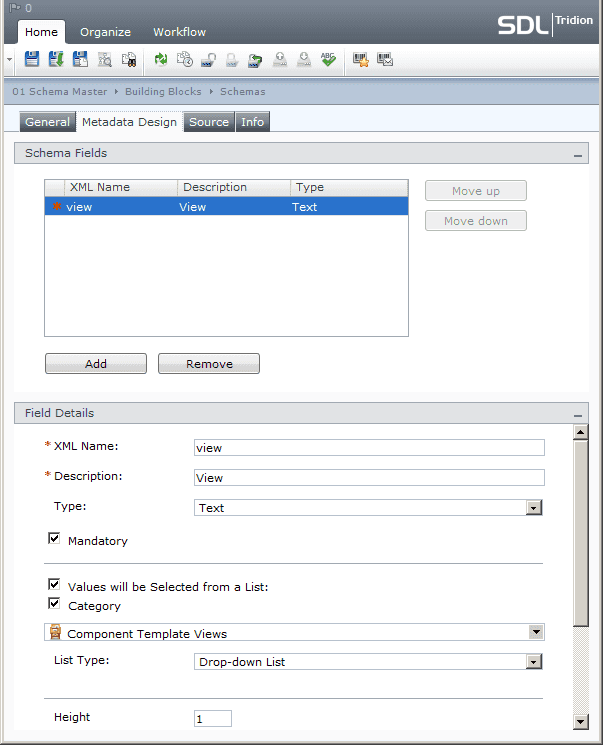
To create content we will first need a Schema. Create a new Schema called Article in 01 Schema Master > Building Blocks > Schemas. Give it a title and body, where body can be a rich text field. DD4T expects rendered content to have a metadata field called view that contains the name of the MVC view file that will be used to render the content. The most convenient way of storing such a list in Tridion is by using categories and keywords. Therefore create two category groups containing the values of the page and component view templates that we will create in our DD4T MVC4 application. In the image above you can see that I've used an Article view for Component Templates and a Default view for Page Templates. Now create two metadata schemas:
- Metadata schema titled
Metadata for DD4T PT, with one field with xml-nameview, which contains the value of the MVC4 view template name used for rendering pages. Values should come from the categoryComponent Template Views. - Metadata for DD4T CT, with also one field with xml-name
view. Values should come from the categoryPage Template Views.
Create Page Templates and Component Templates
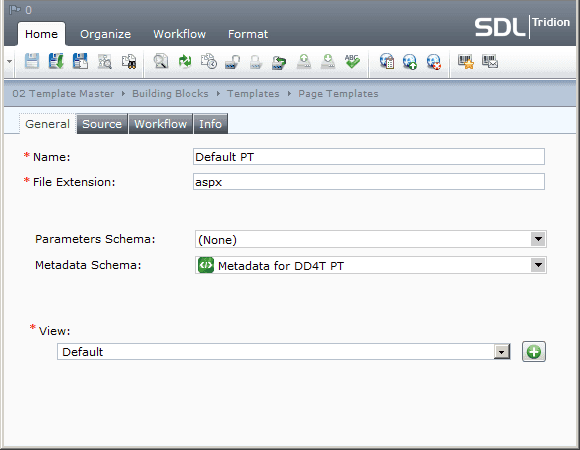
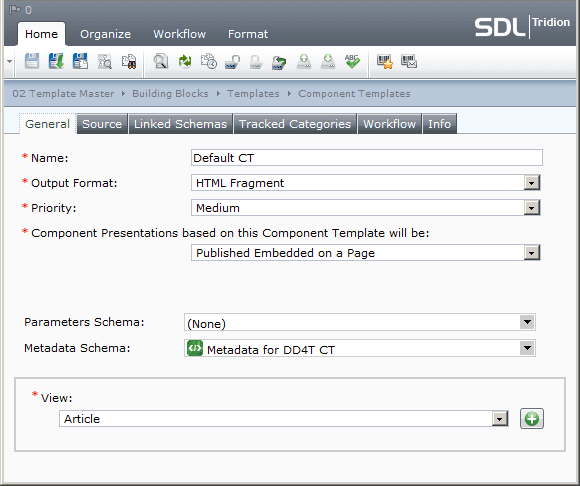
Page and Component Templates in a DD4T set-up consist of various DD4T Template Building Blocks (TBB). A default page or component template contains two TBBs, one for rendering the content as XML and another one for publishing the related binaries such as linked files, images, etc. Perform the following steps to create a page and component template:
- Start the Template Builder and create a new Component Template in the folder
02 Tempate Master > Building Blocks > Templates > Component TemplatesnamedDefault CT. Drag two DD4T TBBs in this CT, namelyGenerate dynamic componentandPublish binaries for component. - Now create a new Page Template in the folder
02 Tempate Master > Building Blocks > Templates > Page TemplatesnamedDefault PT. Drag two DD4T TBBs in this PT, namelyGenerate dynamic pageandPublish binaries for page. - After saving the CT and PT you must close the Template Builder to fully store the items in the database.
- Now go back to the CME and open the Default PT. Set
aspxinstead ofhtmlas default file extension. This will render published pages with IIS's PageHandler instead of the StaticHandler. Now selectMetadata for DD4T PTas metadata schema and selectDefaultas the view to render this PT with. Save and close the PT. - Now open the Default CT, select
Metadata for DD4T CTas metadata schema and select theArticleview as the view to render this CT with. Save and close the CT.
Publish your first content
We've created a schema and two templates for rendering the component and page content. Now it's time to create our first content. We do this by first creating a component and then adding this component to a newly created page:
- Create a new component named
Homein03 Content Master > Building Blocks > Content. Base this component on the Article schema. - Now create a new page in
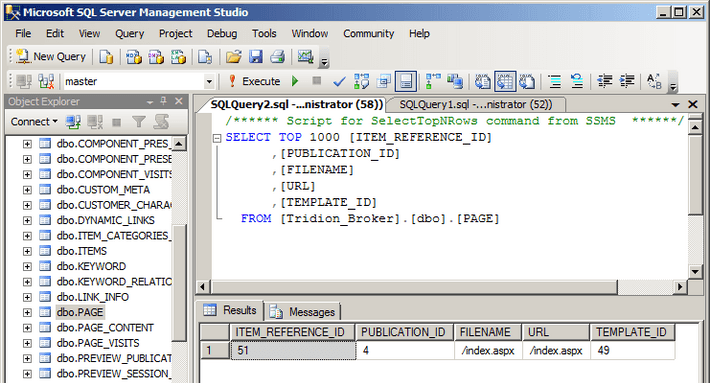
03 Content Master > RootnamedHomeand filenameindex.aspx. Base this page on theDefault PT. Add the just createdHomecomponent to the page and use theDefault CTto render the component. Save and close the page. - Publish the newly created page and check if the page is visible in the Tridion Broker PAGE table.
Create DD4T MVC4 project
If you've come this far you've succeeded in publishing XML content to the broker database. We can now create a DD4T MVC4 project that will query the broker database and render the content in a web application. Perform the following steps to create your DD4T MVC4 application:
- Open Visual Studio and create a new project based on the
DD4T MVC4 Web Applicationtemplate. - By default the DD4T MVC4 Web Application contains a reference to Tridion 2013. As we're using Tridion 2011SP1 we need to remove the reference to Tridion 2013. Do this by opening the Application References and deleting
DD4T.Providers.SDLTridion2013. - Now add a reference to Tridion 2011SP1 by opening the Package Manager Console and run:
PM> Install-Package DD4T-Tridion-2011sp1 - Set the
DD4T.PublicationIdapplication setting variable in the web.config to the publication ID where content is published from (in this example the publication ID would be 4). Also set the DD4T.DefaultPage toindex.aspxand the DD4T.ProviderVersion toTridion2011sp1. - Open
App_Start > DependencyInjection > DD4TNinjectModule.csand change the dependency fromDD4T.Providers.SDLTridion2013toDD4T.Providers.SDLTridion2011sp1. - Copy the files
Tridion.ContentDelivery.Configuration.dll,Tridion.ContentDelivery.Interop.dll,netrtsn.dllfrom the Tridion bin folder to the bin folder of your MVC4 application. - Open IIS Manager and create a new website called
DD4T demo, point the Physical Path to the MVC4 application directory, add a binding (e.g.localhost:81) and set the Application Pool to .Net 4. - Go back to Visual Studio, open the solution properties pane, go to the Web tab and set
Local IISas server, project URL as http://localhost:81 and override the application root URL, also with http://localhost:81. - Run your solution.
If everything works according plan you should see a server error page with the message that the Default view could not be found. This happens because we specified in the Page Template that the published page should be rendered with a view called Default. The error page also shows a list of all the locations where DD4T was looking for the Default view. By default DD4T will look in the /views/page/ and /views/shared/ directories. As the Default view doesn't exist yet, let's create one:
- Go back to Visual Studio and create a new view in the folder
Views > Page. Name the viewDefaultand use the Razor view engine. - Replace the content of the view with the following code:
| @model DD4T.ContentModel.IPage | |
| @using DD4T.Mvc.Html | |
| @{ | |
| ViewBag.Title = @Model.Title; | |
| } | |
| <h1>@Model.Title</h1> | |
| @Html.RenderComponentPresentations() |
The DD4T framework provides html helper functions, such as RenderComponentPresentations() used in this view. Others are RenderComponentPresentationsByView() or RenderComponentPresentationsBySchema(). For more information see the DD4T wiki on page views. Now run your project. If you're doing it right you should see a server error page with the message the view Article or its master was not found. In our Component Template we specified that the component renders with the Article view. So let's also create the Component view:
- Go back to Visual Studio and create a new view in the folder
Views > Component. Name the viewArticleand use the Razor view engine. - Replace the content of the view with the following code:
| @using DD4T.Mvc.Html | |
| @model DD4T.ContentModel.IComponentPresentation | |
| @{ | |
| Layout = ""; | |
| } | |
| <h2>@Model.Component.Fields["Title"].Value</h2> | |
| @Model.Component.Fields["Body"].Value.ResolveRichText() |
The component fields are accessible by using the @Model.Component.Fields. For the body field we use the extension method ResolveRichText(). If you call this method, the links inside the rich text field are resolved, and the xhtml and xlink namespace references are removed. Use this wherever you need to write out rich text. For more information see the DD4T wiki on component views. Run your project again and you should see your rendered page. Congratulations! You've got your first DD4T website running! Next steps are to create more content with different schemas and templates, create things such as a navigation solution, caching, multi-language solutions, etc.
This post, together with the previous post on setting up a Virtual Machine for Tridion development, covers all aspects to get you started with Tridion development in combination with DD4T on your local machine. Please let me know if you liked this post. Suggestions and comments are highly appreciated, as well as your own experiences with DD4T development environments.

